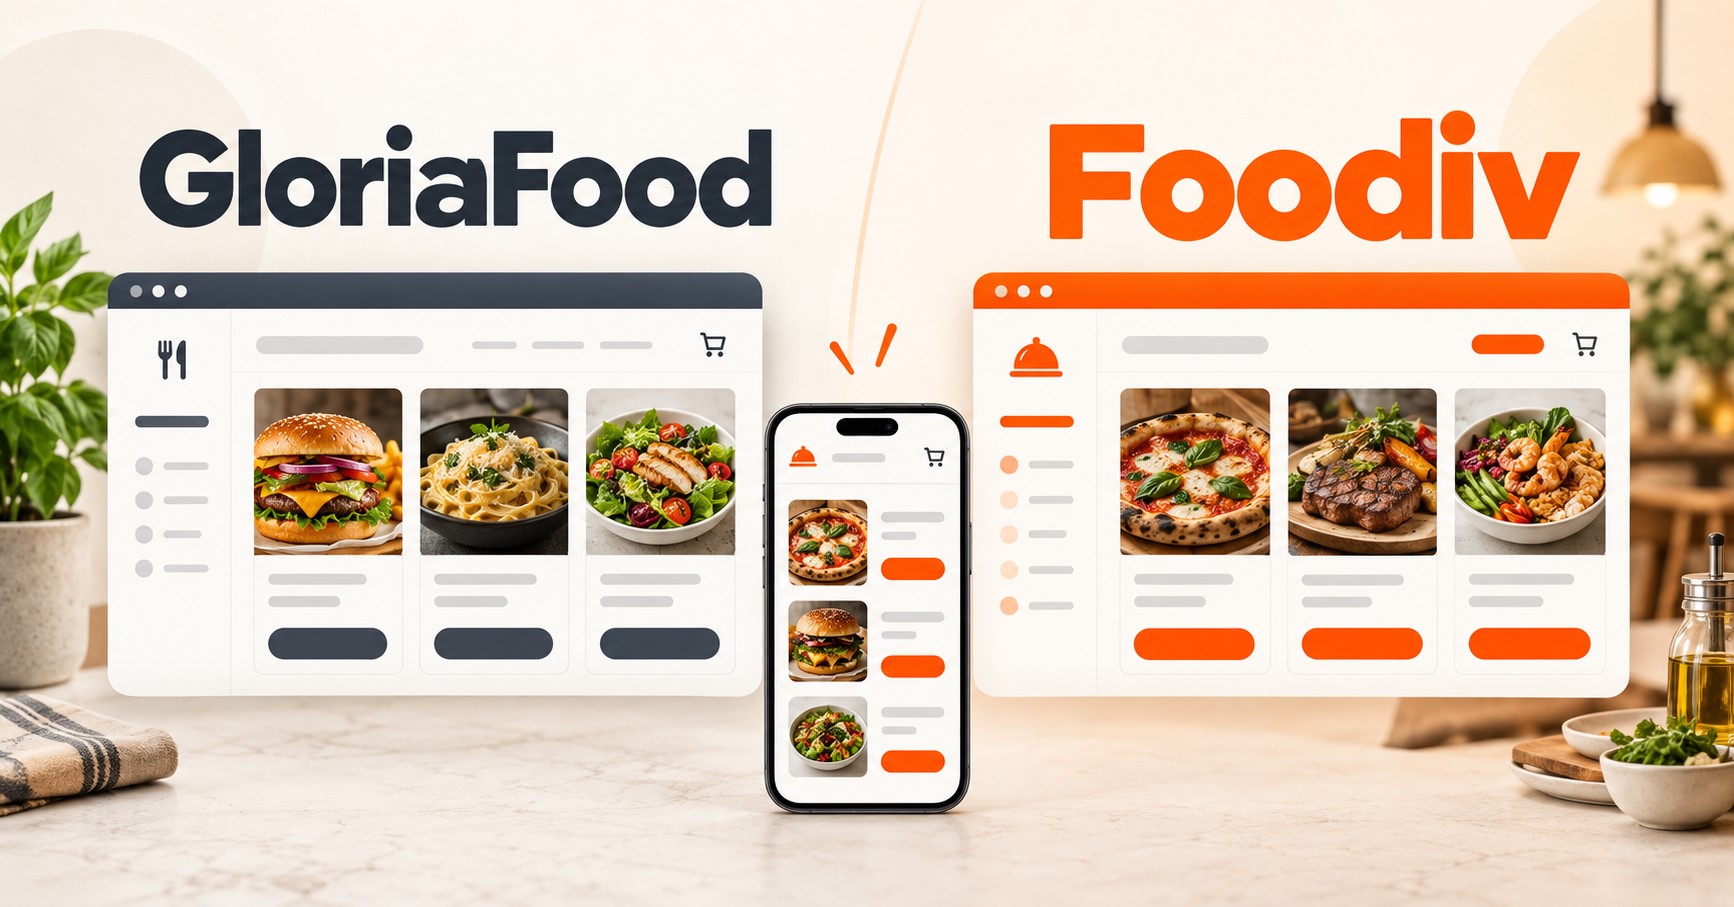
Foodiv lets restaurant owners import supported menu data from GloriaFood without rebuilding every item manually. Here is a quick look at what you need, what the feature transfers, and what to check before launching your new ordering system.
| Question |
Answer |
| What do you need? |
GloriaFood admin access, a Foodiv account, the vendor email, and a GloriaFood Restaurant Key. |
| What can be imported? |
Categories, products, variants, and modifier groups. |
| Where does the import start? |
From the Menu Management section in the Foodiv dashboard. |
| Can the menu be assigned to an outlet? |
Yes. You can assign the imported menu to the default outlet. |
| Does the import run in the background? |
Yes. The process continues in the background and may take a few minutes. |
| Is a final review required? |
Yes. Always review the imported menu and place test orders before launch. |
What Is Foodiv’s One-Click GloriaFood Menu Migration?
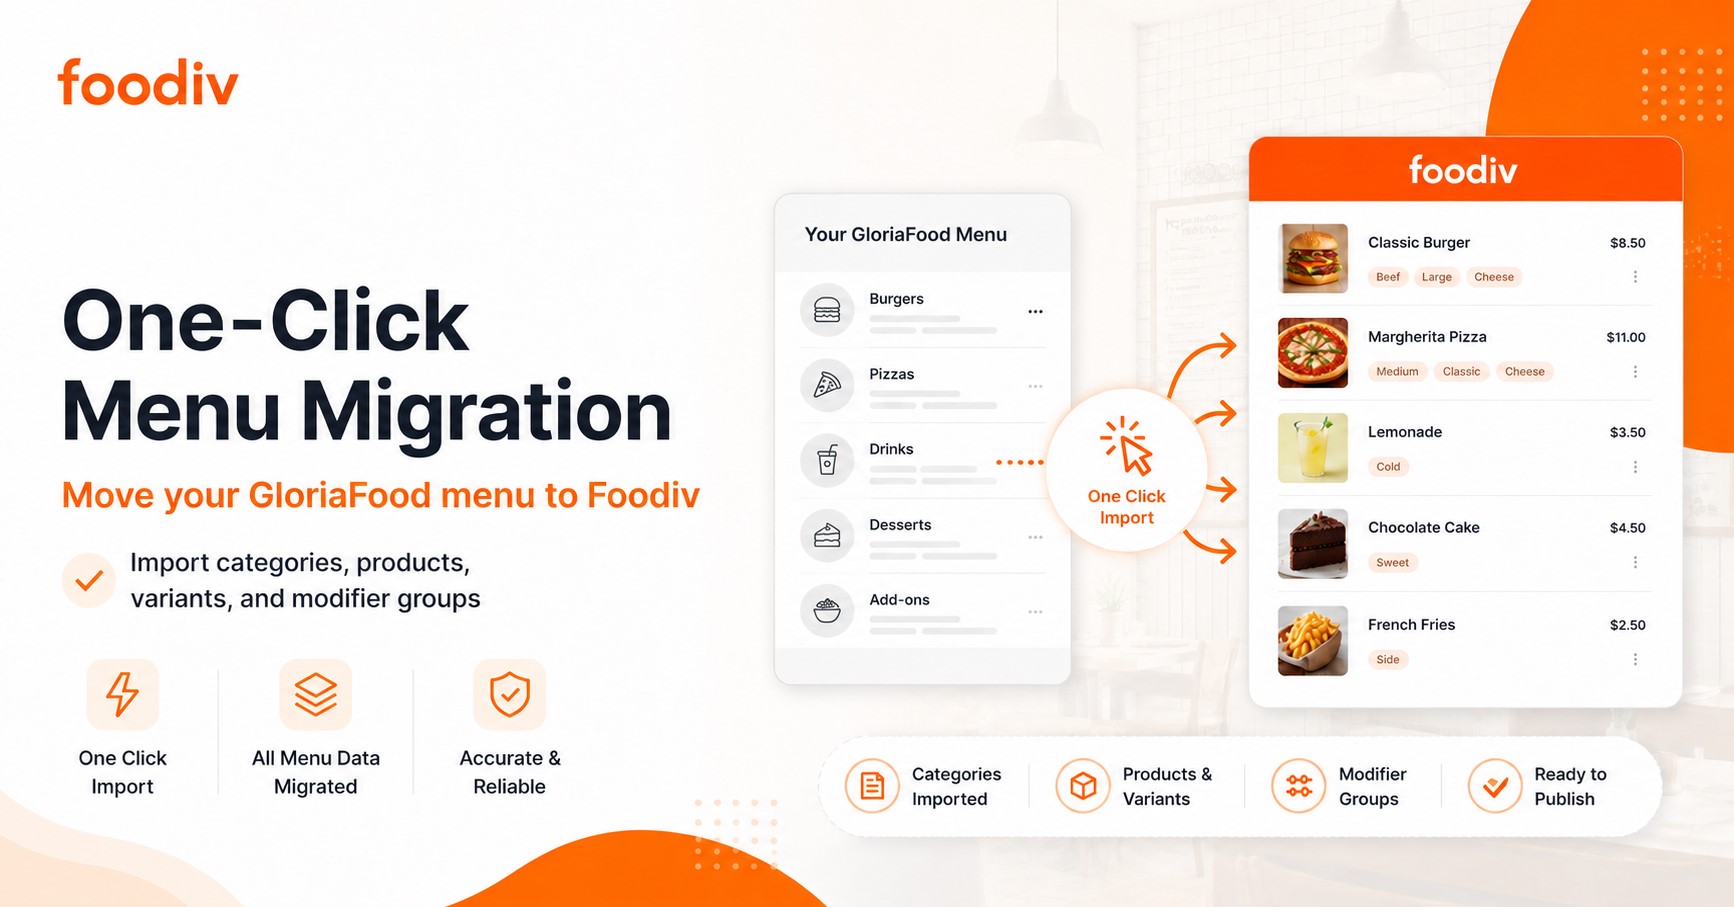
Foodiv’s one-click GloriaFood menu migration is a menu import feature that uses the GloriaFood Restaurant Key to transfer supported categories, products, variants, and modifier groups into Foodiv.
Here’s how it works. First, the restaurant connects the Fetch Menu API inside GloriaFood and approves access. GloriaFood then generates a Restaurant Key. Foodiv uses that key to retrieve the supported menu information from the correct restaurant account.
This saves restaurant owners from rebuilding every category and product manually. Variants such as sizes can be imported, along with modifier groups for toppings, extras, sides, or other choices. The imported menu can also be assigned to the default Foodiv outlet during the setup.
Once the restaurant clicks Import, Foodiv starts the process in the background. The import may take a few minutes, depending on the size and complexity of the menu.
The menu does not go live automatically. Restaurant owners can review the imported categories, products, prices, variants, and modifiers before accepting customer orders. This review helps catch missing information, incorrect prices, duplicate items, or modifier rules that need adjustment before launch.
What You Need Before Starting the Migration
Before you begin, make sure you have the right access and details ready. This keeps the setup simple and avoids delays during the import.
- Administrator access to the GloriaFood restaurant account
- An active Foodiv restaurant account
- The API vendor contact email provided by Foodiv
- Access to the Integrations section in GloriaFood
- The GloriaFood Restaurant Key
- The correct Foodiv outlet selected for the imported menu
- Enough time to review categories, products, prices, variants, and modifiers
- A plan to place test orders before launch
Here’s the important part. The menu import saves time, but it still needs a final check. Review the imported data carefully and test the customer ordering flow before accepting live orders.
Agencies and resellers managing several restaurants should create and verify the integration separately for each GloriaFood account. Label every Restaurant Key clearly so the correct menu goes into the correct Foodiv account.
How to Migrate a GloriaFood Menu to Foodiv
You only need to connect GloriaFood’s Fetch Menu API once and use the generated Restaurant Key in Foodiv. Follow these steps carefully, then review the imported menu before accepting live orders.
Step 1: Open Integrations in GloriaFood
Sign in to your GloriaFood restaurant dashboard using an administrator account. From the main navigation, open:
GloriaFood Dashboard → Integrations → Your Integrations
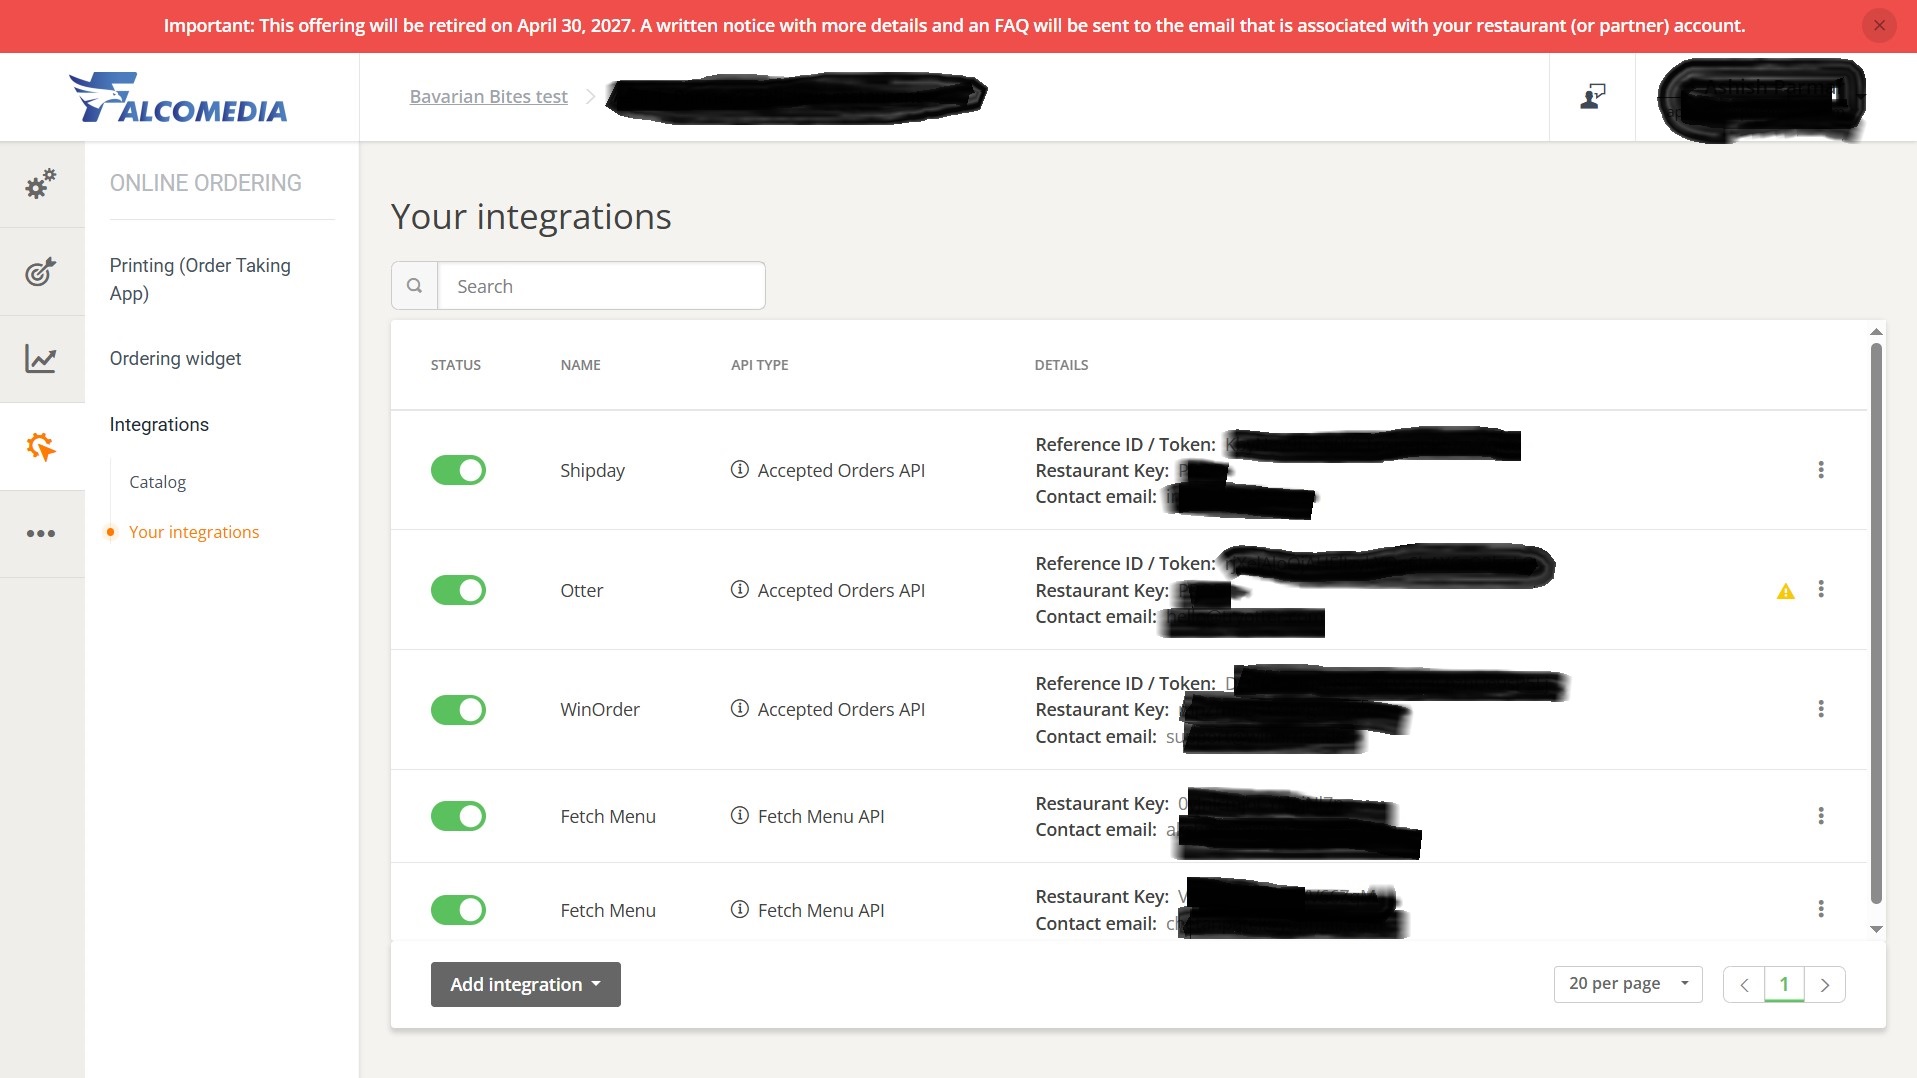
The Your Integrations page shows every active connection linked to the restaurant. Scroll to the bottom of the page and click Add integration.
Make sure you are signed in to the correct restaurant account before continuing. This matters when you manage several restaurant locations or client accounts because each restaurant generates its own Restaurant Key.
Step 2: Select Custom Integration
Clicking Add integration opens a list of available integration options. Choose Custom integration from this list.
This option lets the restaurant connect an external platform such as Foodiv using one of GloriaFood’s available API templates. You do not need to select Shipday, Tookan, WinOrder, or any other delivery or order management integration shown in the menu.
Step 3: Choose the Fetch Menu Template
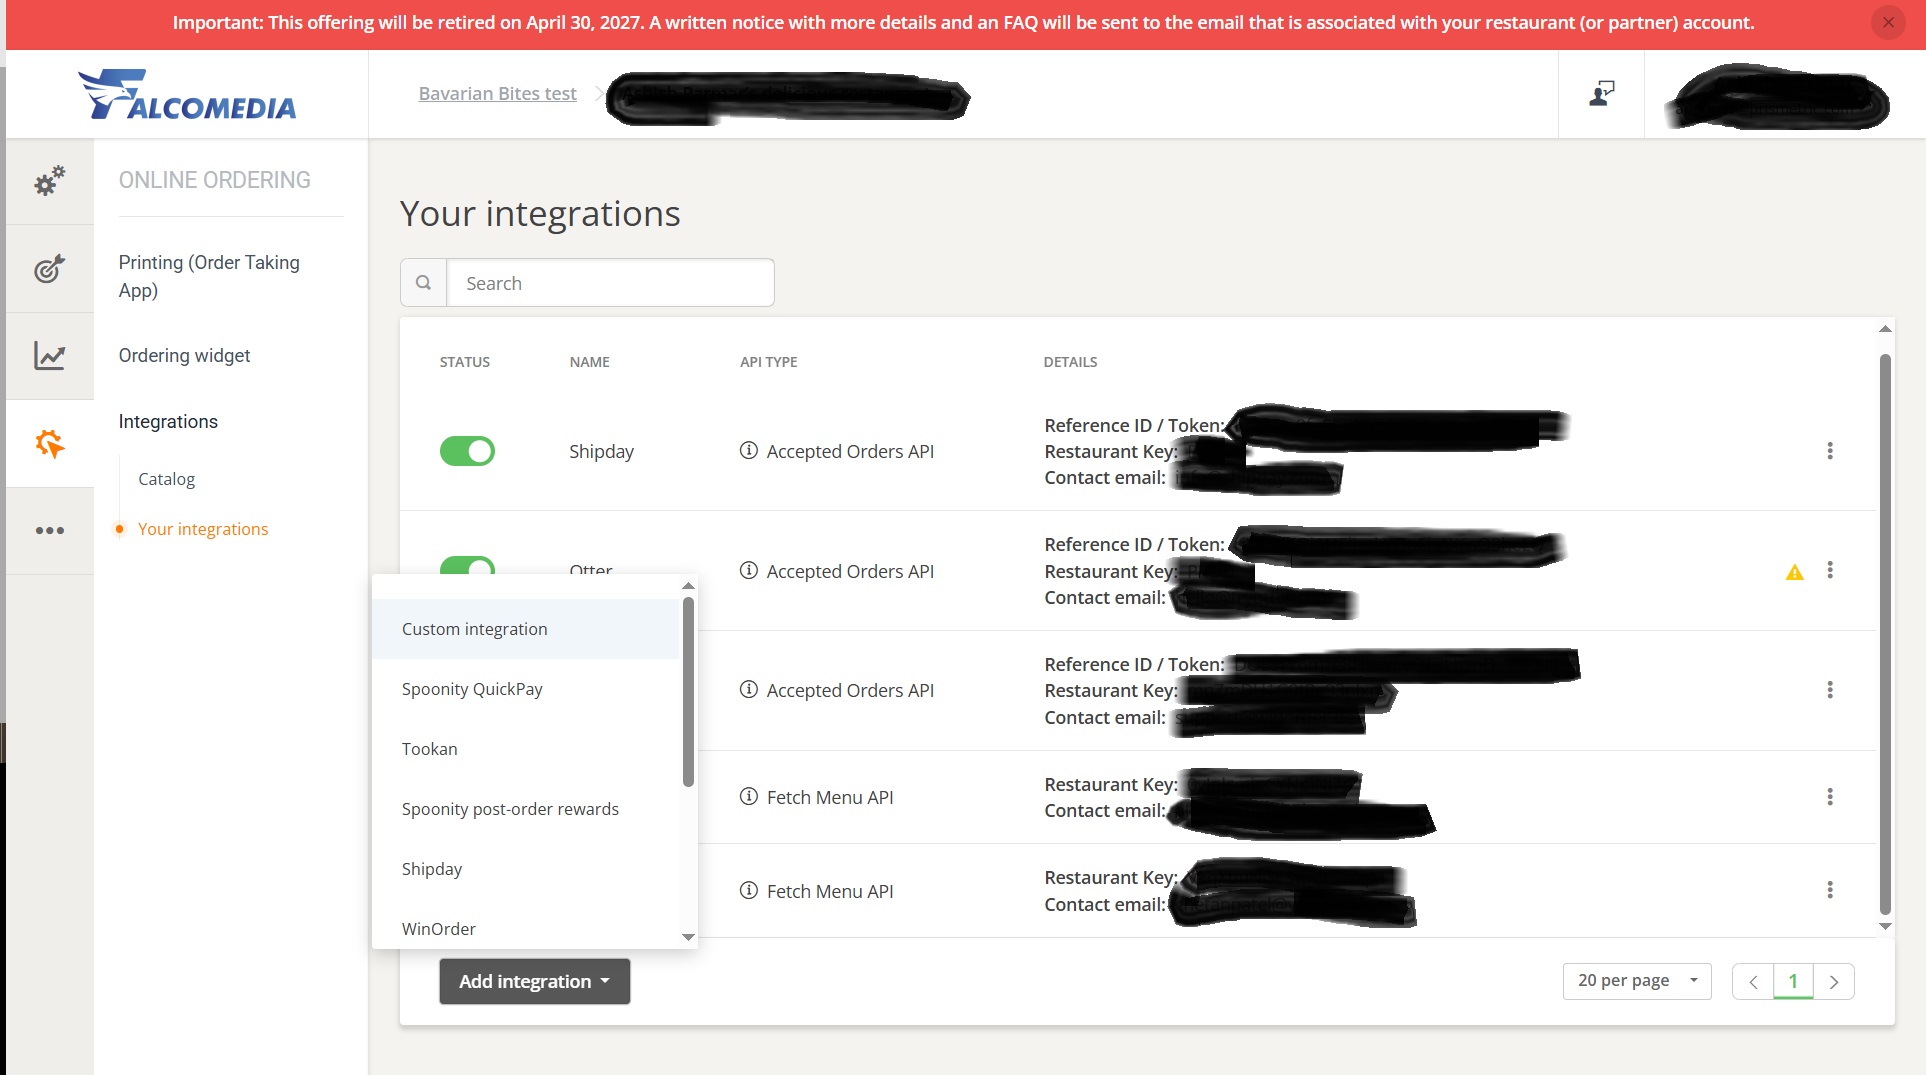
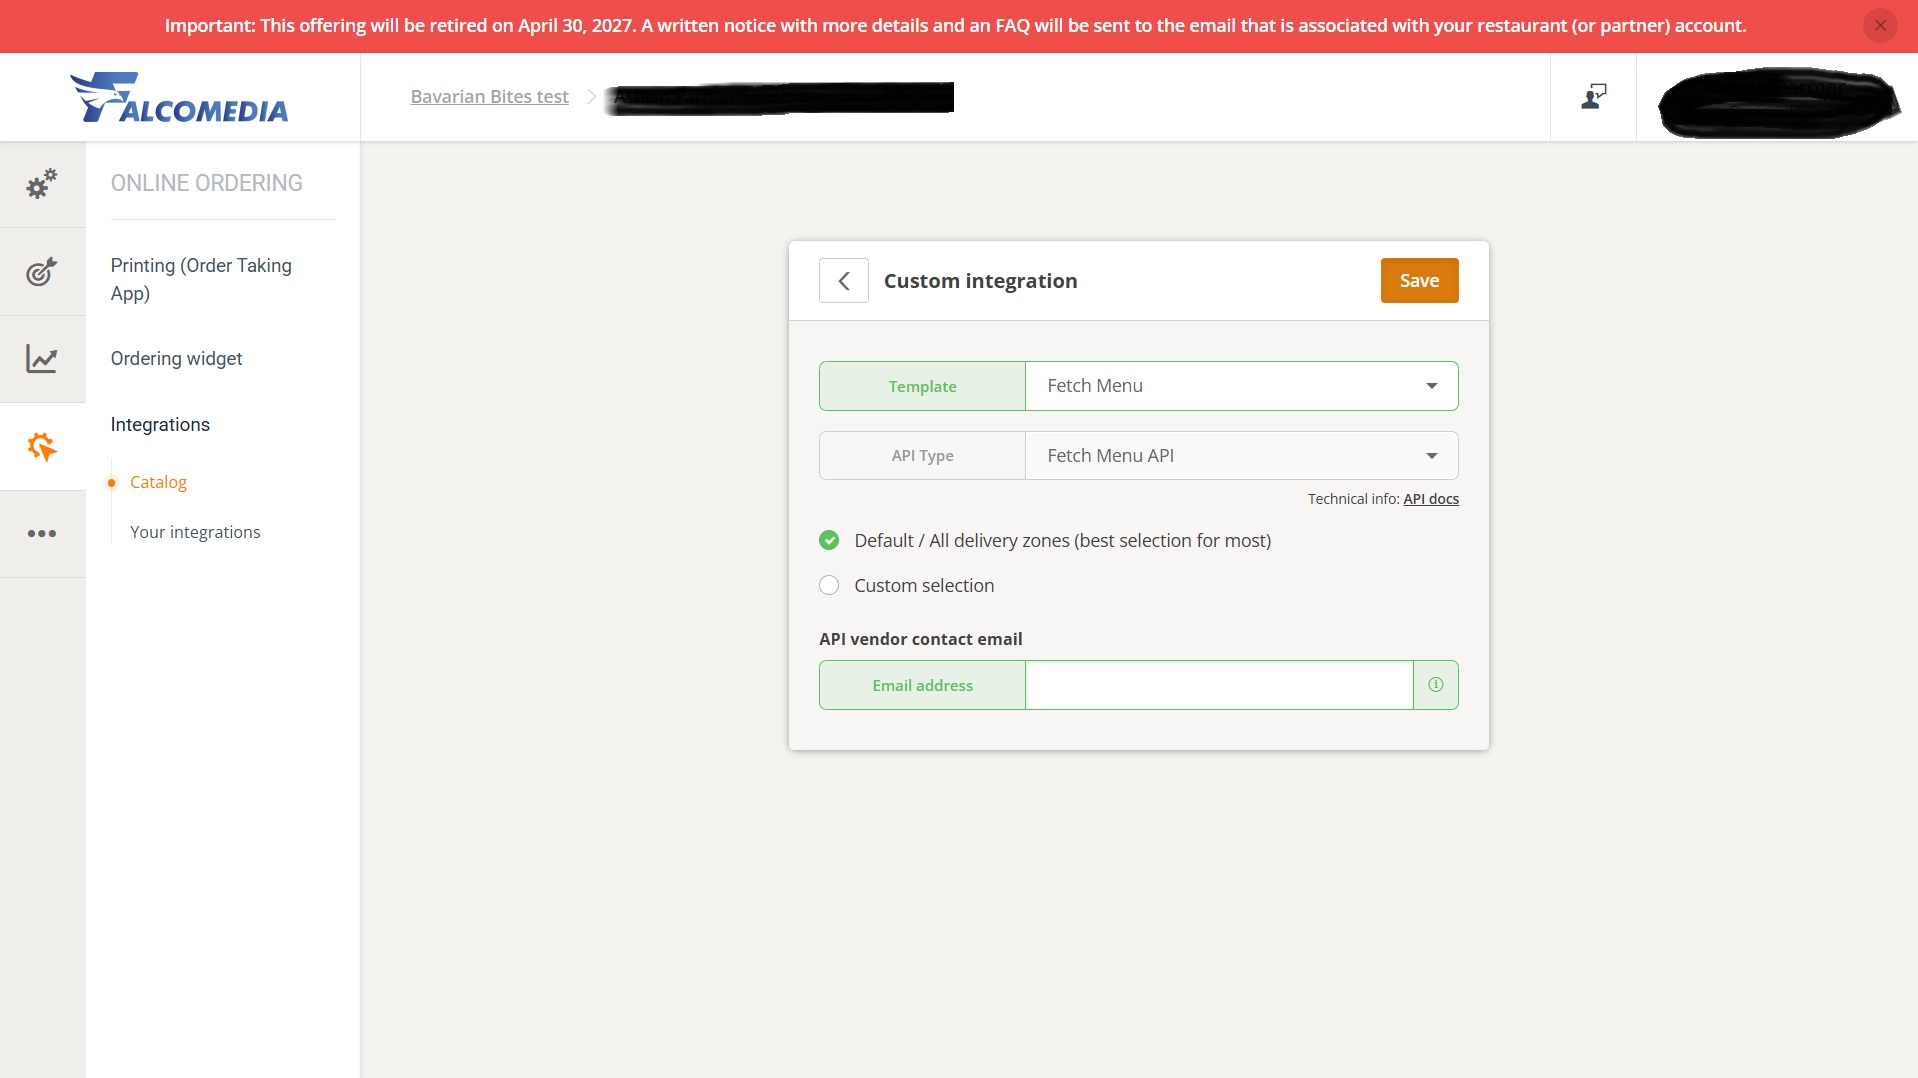
The Custom Integration window includes fields for the template, API type, delivery zones, and vendor contact email.
Choose Fetch Menu in the Template field. GloriaFood should then show Fetch Menu API as the API type.
Select Default / All delivery zones in most cases. Choose Custom selection only when you need the integration to apply to specific delivery zones.
Enter the API vendor contact email provided by Foodiv.
Do not select Accepted Orders API. That API handles accepted order information. The Fetch Menu API gives Foodiv permission to retrieve supported menu data such as categories, products, variants, and modifier groups.
Step 4: Save the Integration and Approve Access
Check the selected template, API type, delivery zone option, and vendor email. Once everything looks correct, click Save in the upper-right corner.
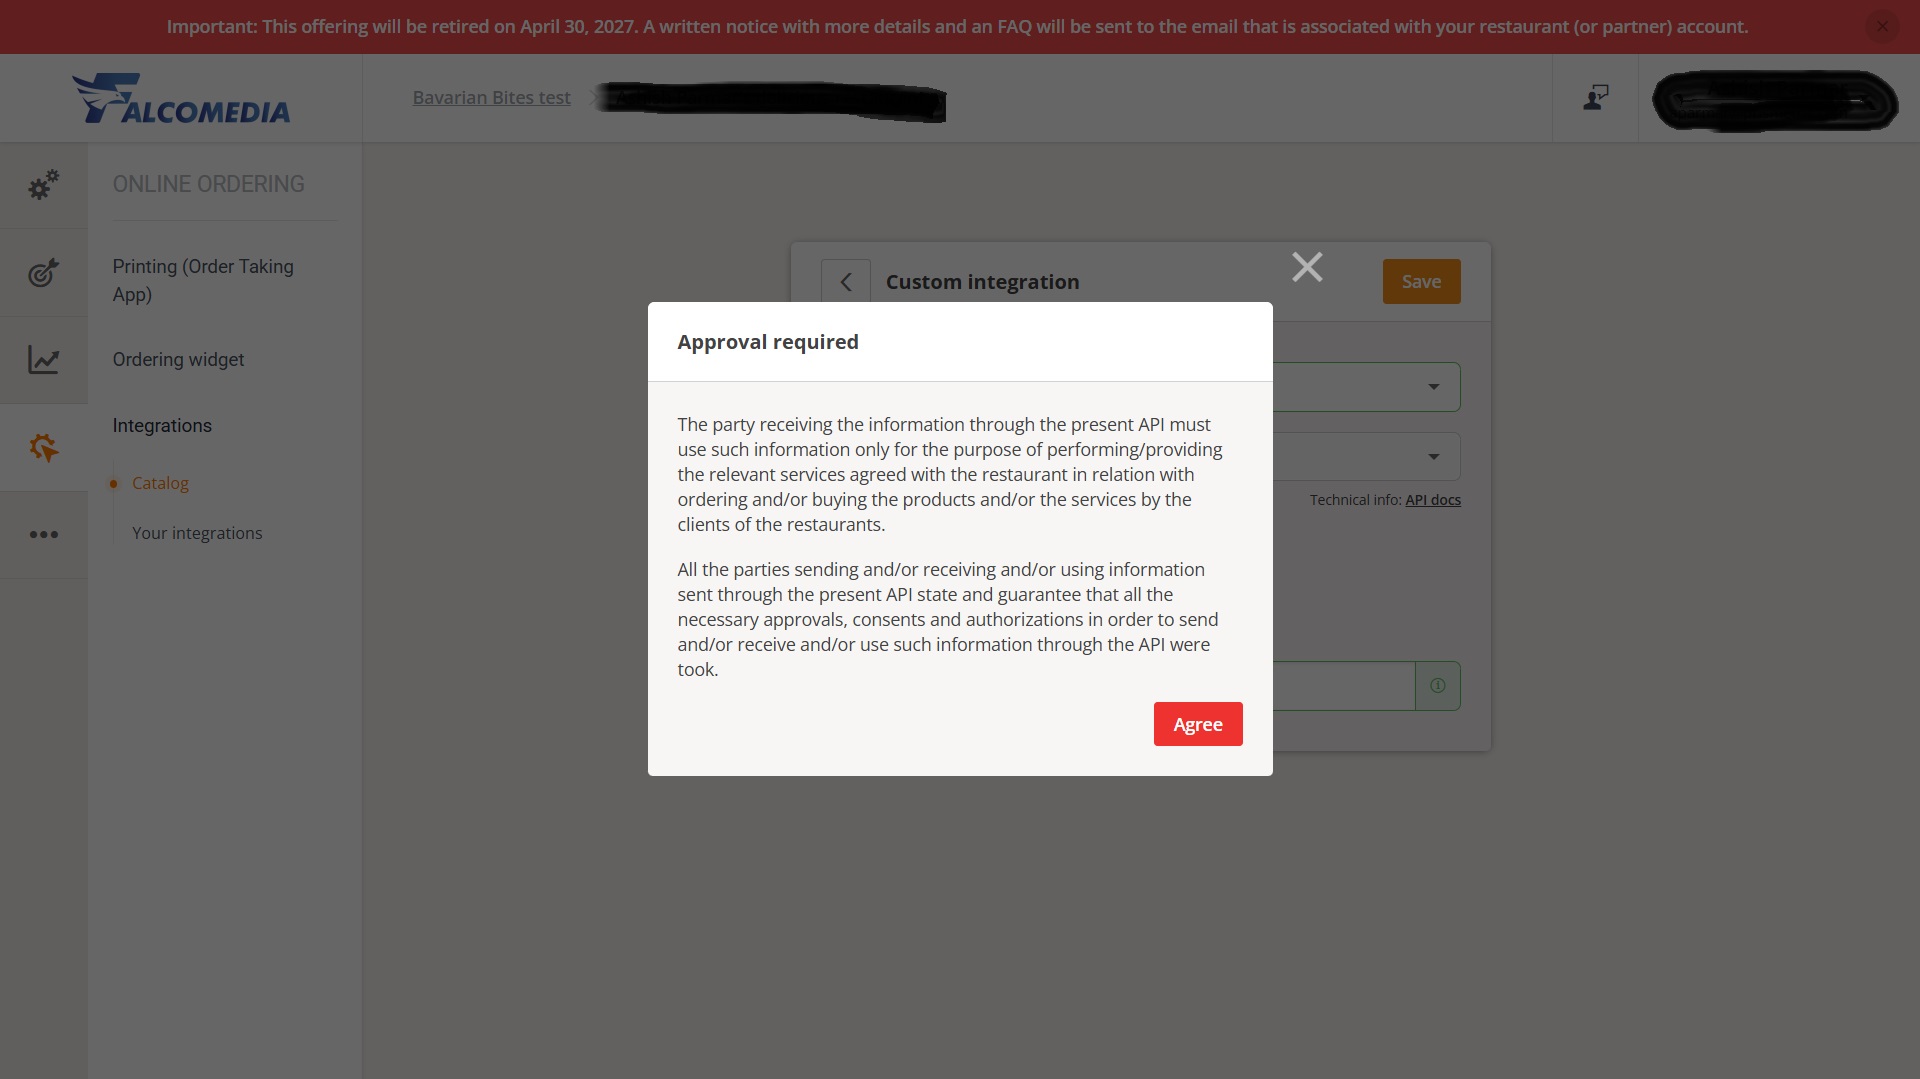
GloriaFood will display an Approval required notice. It explains how the receiving party can use the menu information shared through the API.
The restaurant owner or another authorized user should read the notice and click Agree to approve the connection.
Only approve access when your restaurant has authorized Foodiv to receive its menu information. Do not let an unknown vendor or unauthorized person create this connection.
Step 5: Copy the GloriaFood Restaurant Key
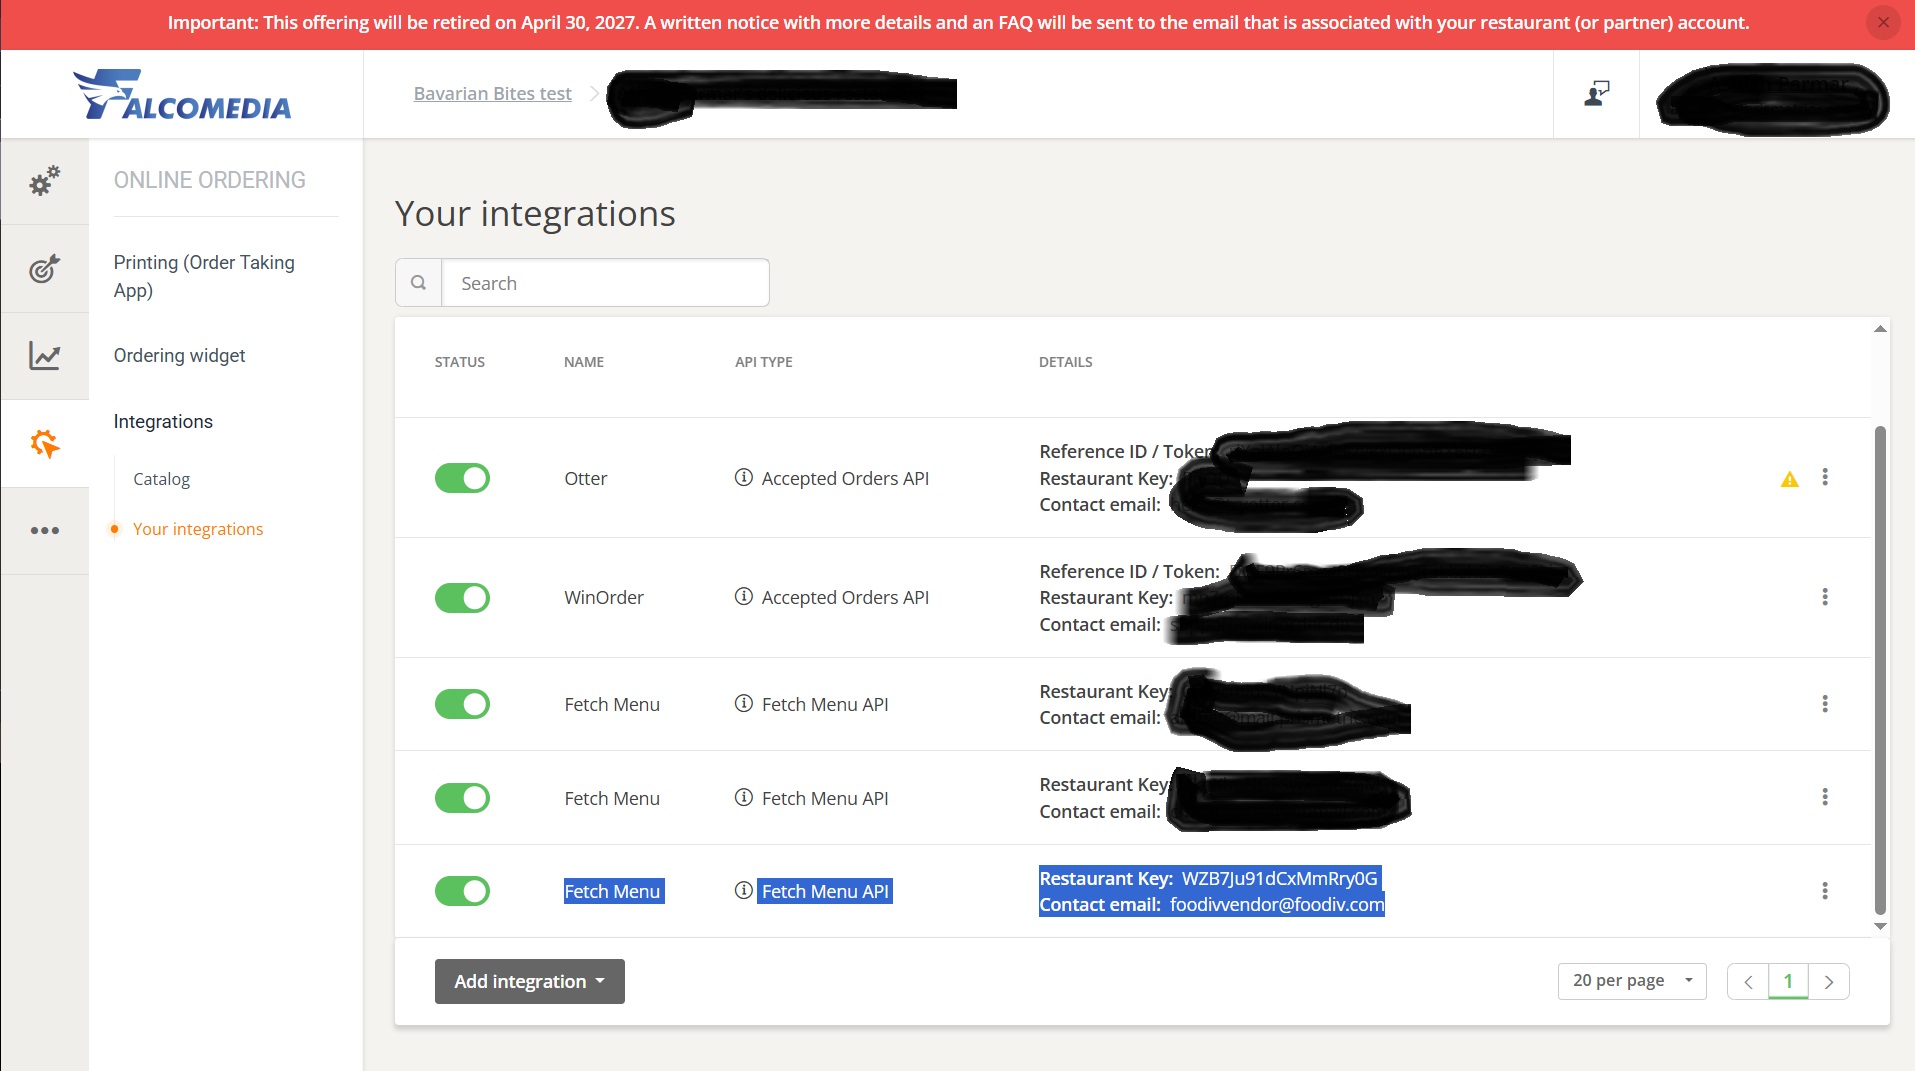
After approval, the new Fetch Menu integration appears on the Your Integrations page. The entry includes:
- Integration name
- API type
- Restaurant Key
- Vendor contact email
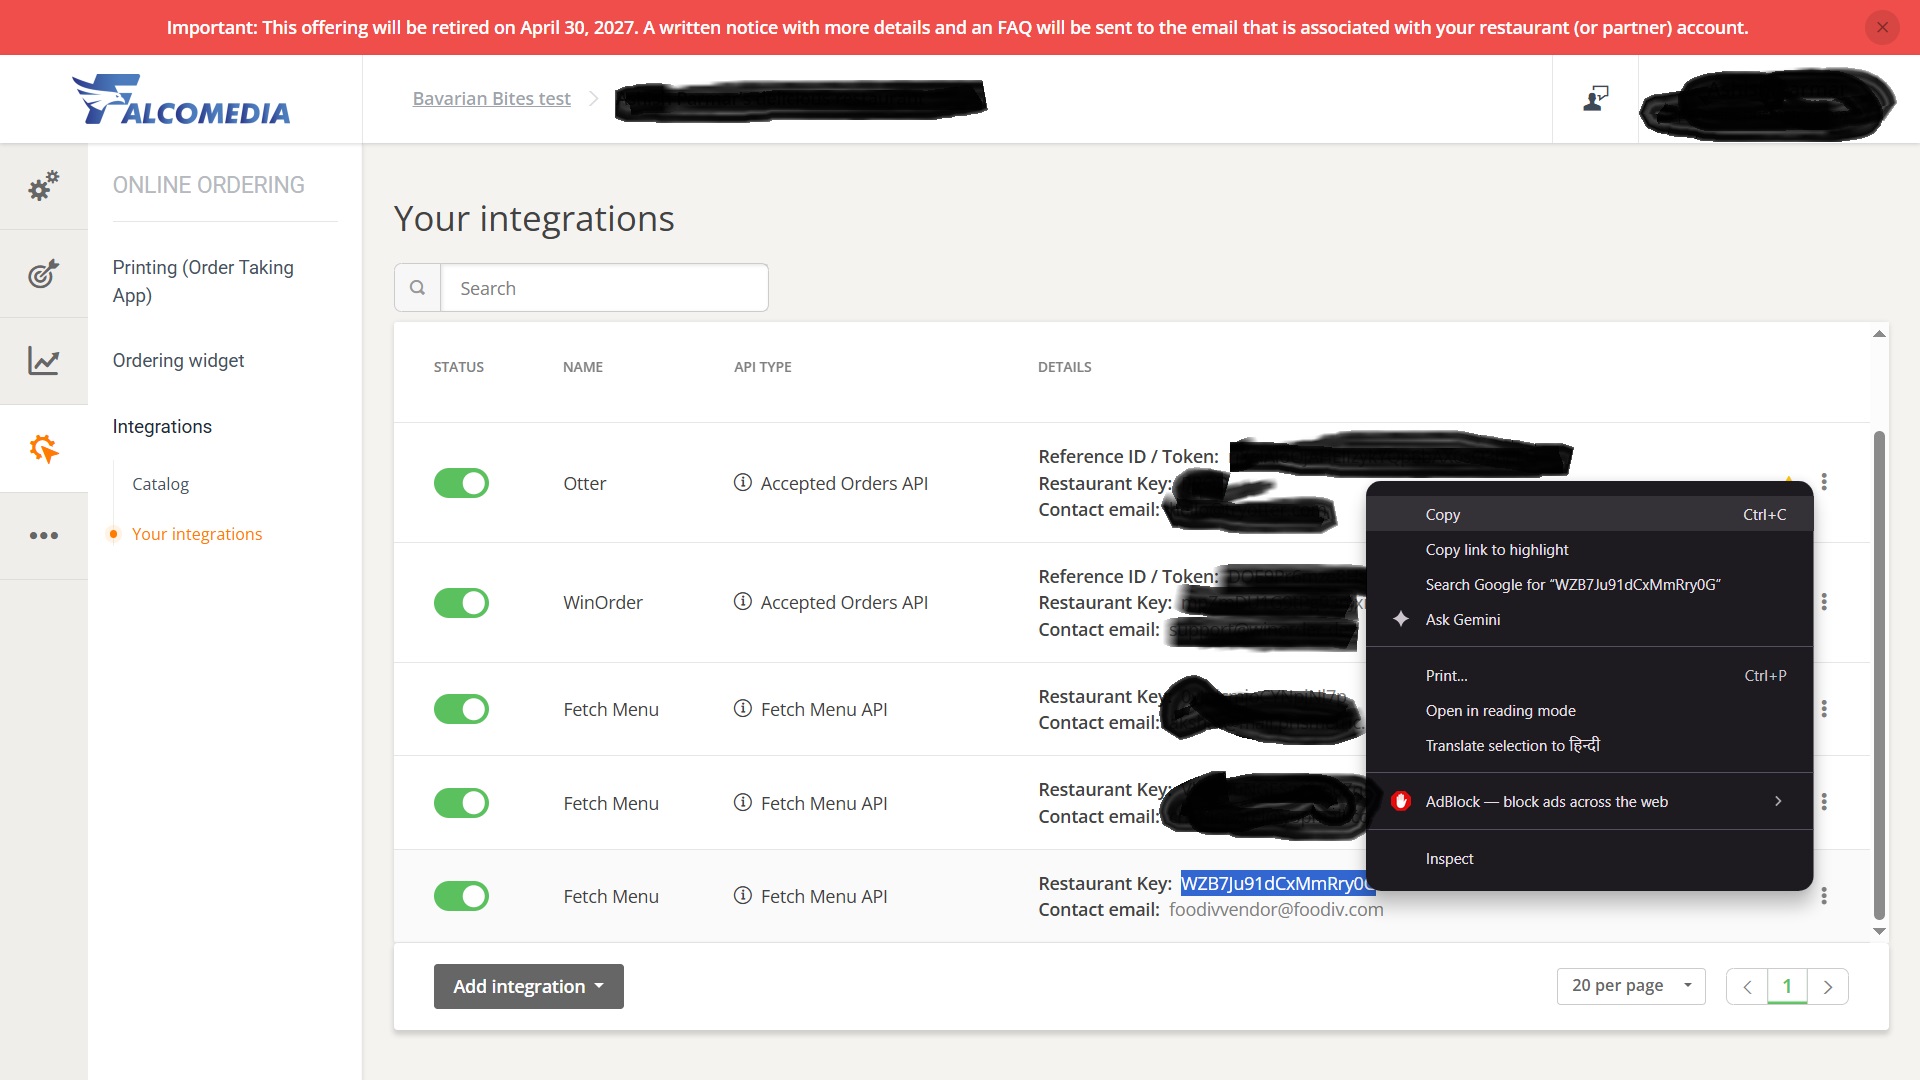
Find the Restaurant Key and copy it carefully. Foodiv uses this key to identify the correct GloriaFood restaurant and retrieve its supported menu information.
Make sure you copy the complete key without adding spaces. A missing character or incorrect key may stop the connection from working.
Treat the Restaurant Key as private information. Do not publish it in blog screenshots, training documents, social posts, public support forums, or videos. Blur the key and personal email addresses before publishing these screenshots.
Step 6: Open Menu Management in Foodiv
Sign in to the Foodiv restaurant dashboard and open:
Foodiv Dashboard → Menu & Products → Menu Management
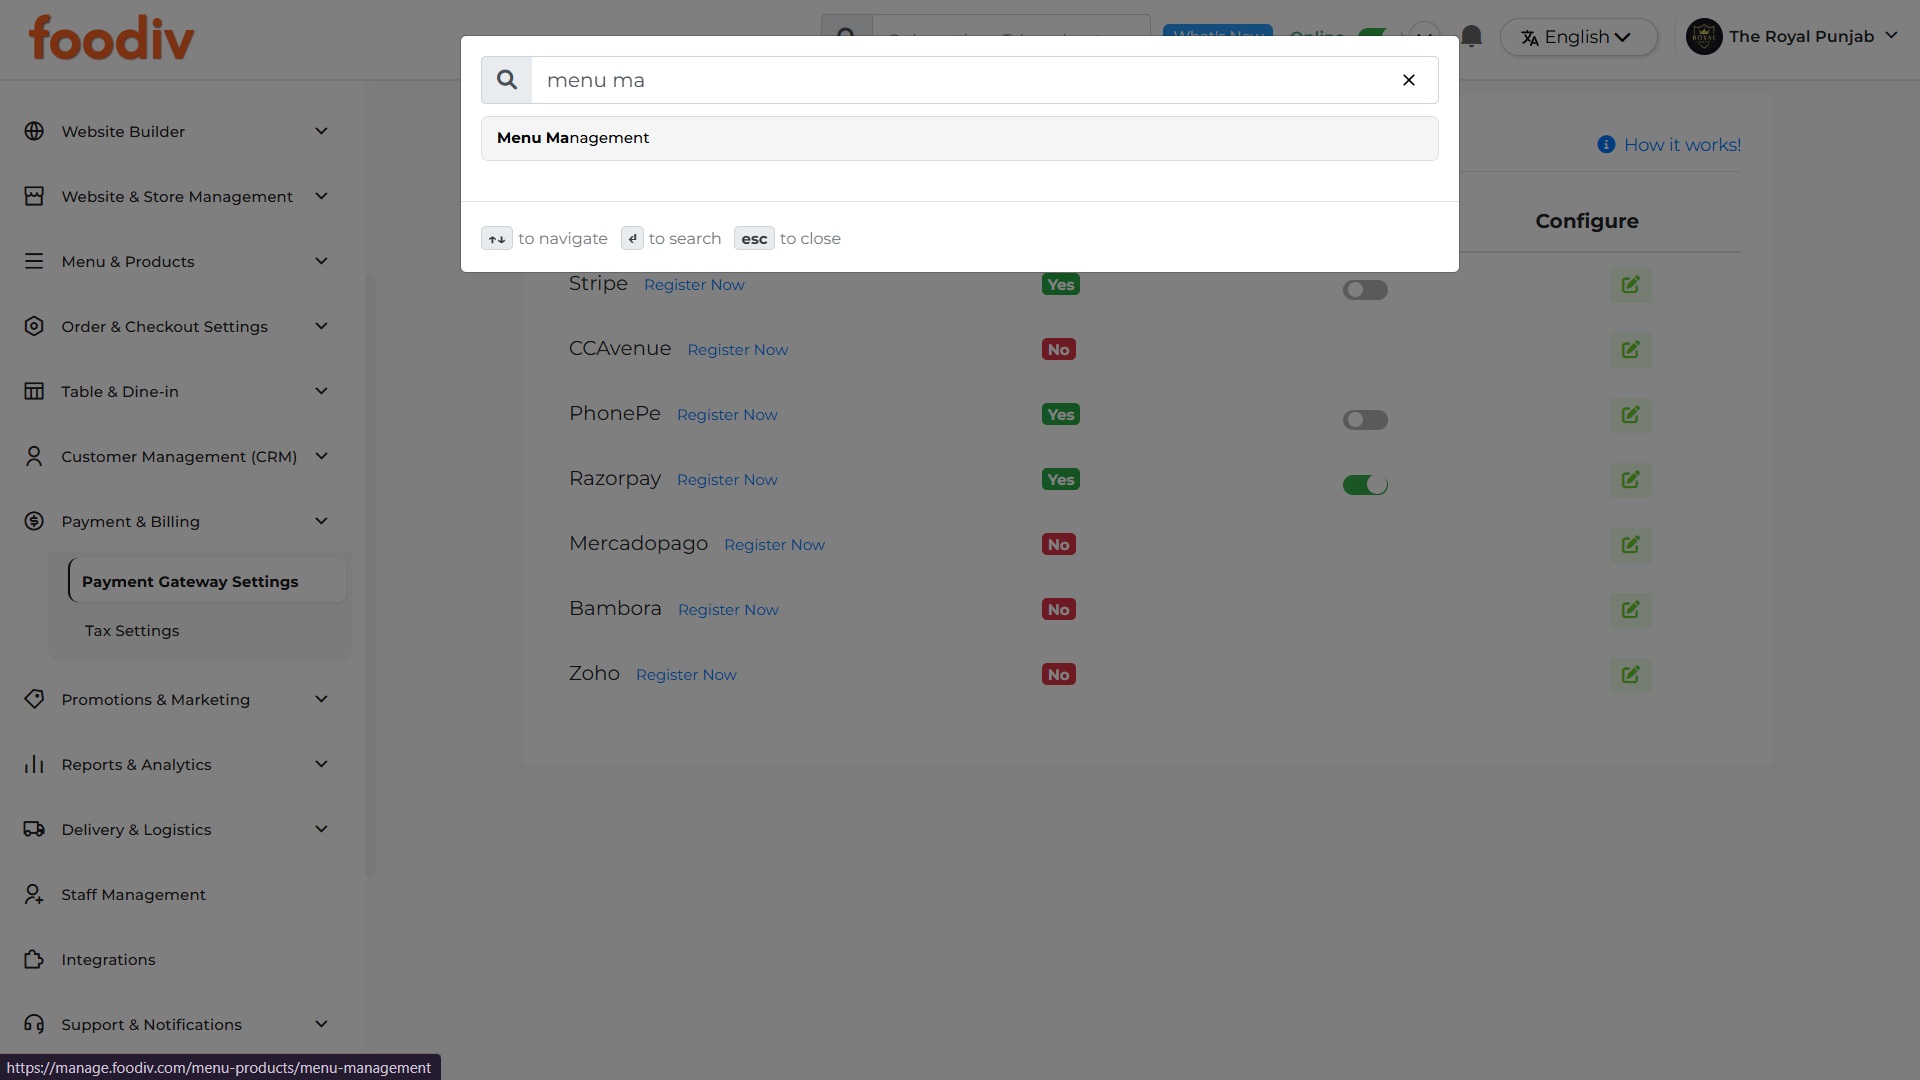
You can also use the dashboard search bar to find Menu Management quickly.
Once the page opens, click Import Items from GloriaFood in the upper-right area. Foodiv will open the menu import window where you can enter the Restaurant Key copied from GloriaFood.
Step 7: Enter the GloriaFood Restaurant Key
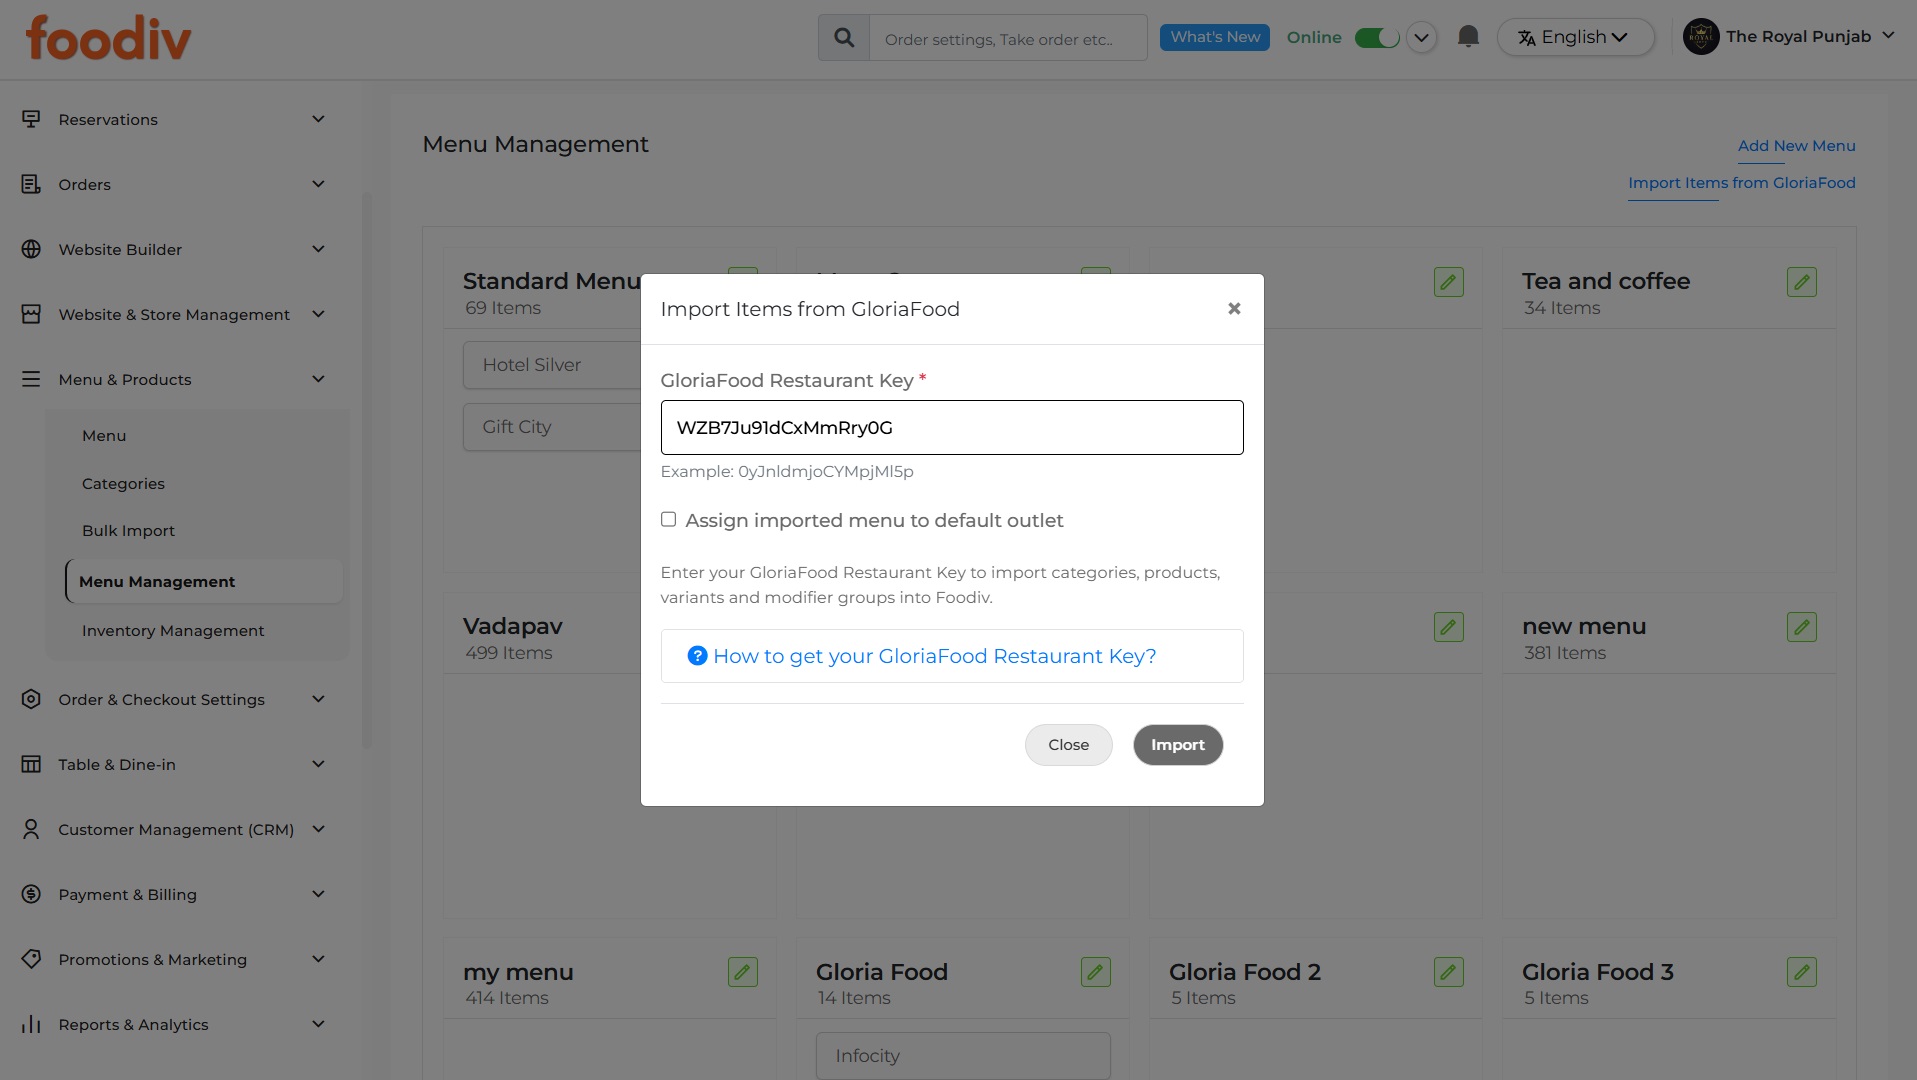
Paste the copied key into the GloriaFood Restaurant Key field. Check the value once more to make sure you entered the complete key.
Foodiv also gives you the option to select Assign imported menu to default outlet.
Select this option when you want the imported menu connected to your default restaurant location. Leave it unchecked when you want to review the menu first or assign it to a different outlet later.
Once the key and outlet option are correct, click Import. Foodiv will check the connection and start retrieving the supported menu information.
Step 8: Wait for the Background Import
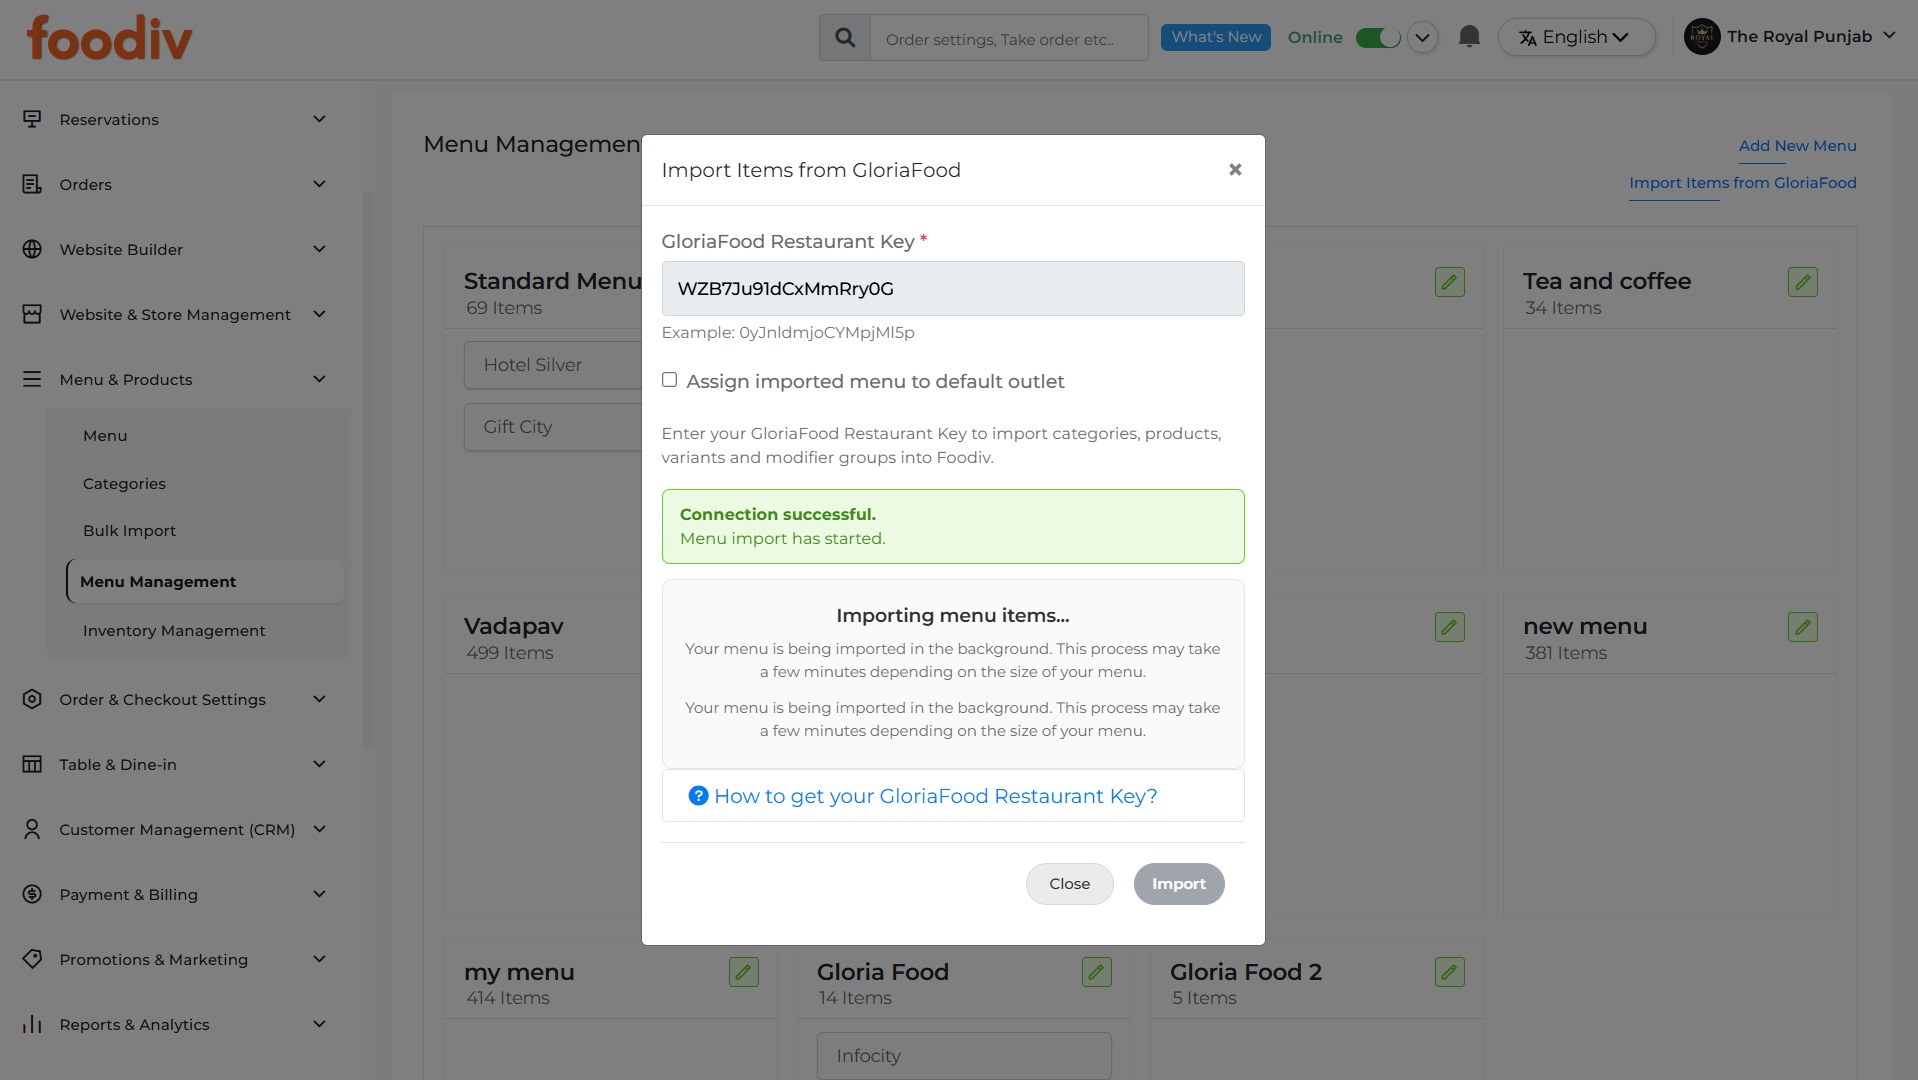
When Foodiv connects successfully, the import window displays messages such as:
- Connection successful
- Menu import has started
- Importing menu items
Foodiv processes the menu in the background, so you do not need to rebuild each item while the import runs.
The process may take several minutes. The exact time depends on the size and structure of your menu. A restaurant with hundreds of products, variants, toppings, and modifier groups may need more time than a small cafe menu.
Avoid starting the same import again while the first one is still running.
Step 9: Review the Imported Menu
Once the import finishes, return to Menu Management and open the imported menu. Do not start accepting live orders until you have checked the customer-facing setup carefully.
Review the following details:
- Category names and their display order
- Product names and prices
- Product sizes and variants
- Modifier groups and add-ons
- Required and optional modifier settings
- Minimum and maximum selection limits
- Product availability
- Duplicate products or categories
- Menu and outlet assignment
- Tax settings
- Product descriptions
- Product images, where available
- Preparation times and ordering settings
Compare the imported Foodiv menu with the original GloriaFood menu side by side. Pay close attention to products with several sizes, topping combinations, meal upgrades, or required choices.
The API import removes much of the repetitive setup work, but it does not replace a final review. The restaurant remains responsible for checking that every price, option, tax rule, and availability setting appears correctly before customers place orders.
Place test orders on both desktop and mobile. Test different products, variants, modifiers, payments, pickup options, and delivery settings before publishing the new ordering flow.
What the Import Automates and What Still Needs Setup
Foodiv’s one-click import removes much of the manual work involved in rebuilding a GloriaFood menu. It can bring supported menu data into Foodiv and assign it to the default outlet when that option is selected. However, the import does not complete every part of the restaurant setup. Payment, delivery, branding, hardware, and launch checks still need separate attention.
| Automatically Imported Through the Demonstrated Flow |
Review or Configure Separately |
| Categories |
Payment gateway |
| Products |
Tax settings |
| Variants |
Delivery zones and fees |
| Modifier groups |
Pickup and delivery hours |
| Menu structure |
Website order buttons |
| Default outlet assignment when selected |
QR codes |
| Background menu import |
Branding and domain |
|
Customer and order history |
|
POS or printer setup |
|
Staff training and test orders |
Here’s the key difference. The one-click feature focuses on importing supported menu information. Foodiv’s complete migration support can cover the wider setup, including payment configuration, delivery settings, integrations, testing, and go-live assistance. Restaurants should treat menu import as the starting point, then review every customer-facing and operational setting before launch.
How Long Does GloriaFood Menu Migration Take?
The menu import may take a few minutes after the connection succeeds, depending on the number of categories, products, variants, and modifier groups in the GloriaFood menu.
Menu import time refers to the automated background transfer. Foodiv starts importing the supported menu data once the Restaurant Key is verified.
Menu review time depends on the size and complexity of the menu. A small cafe may finish checks quickly, while a large restaurant with many sizes, toppings, and modifier rules may need more time.
Complete platform migration takes longer because it includes payment setup, delivery rules, pickup hours, QR codes, website links, outlet settings, staff training, and test orders.
What this really means is that the menu can move quickly, but the full restaurant setup still needs careful review before launch.
Benefits of Using Foodiv’s GloriaFood Menu Importer
Foodiv’s menu importer helps restaurant teams move faster and avoid much of the manual work that comes with rebuilding a menu from scratch.
Avoid Rebuilding the Menu Manually
Restaurant teams do not need to recreate every supported category, product, variant, and modifier group one by one. This can save hours of repetitive setup, especially for menus with many items and custom options.
Reduce Copying Mistakes
Manual data entry can lead to incorrect prices, missing items, spelling errors, or broken modifier combinations. Importing structured menu data reduces that risk and gives the team a cleaner starting point for review.
Move Large Menus Faster
The importer is useful for pizzerias, cafes, takeaways, cloud kitchens, and restaurants with complex menus. Businesses with multiple sizes, toppings, extras, and meal options can move their menu without entering each detail again.
Import in the Background
Once the connection succeeds, Foodiv continues the import in the background. Restaurant owners do not need to keep the import window open or wait on the same screen until the process finishes.
Support Outlet Based Menu Management
The imported menu can be assigned to the default Foodiv outlet during setup. This helps restaurants organize menu data for the correct location and makes outlet management easier.
Create More Time for Testing
The time saved during menu setup can be used for more important checks. Teams can review prices, payments, delivery rules, QR codes, website links, and the full customer ordering experience before launch.
Final Verdict: Do You Need to Rebuild Your GloriaFood Menu Manually?
No. Restaurants using the supported GloriaFood integration can connect the Fetch Menu API, copy the Restaurant Key, and import categories, products, variants, and modifier groups into Foodiv.
This removes much of the repetitive work involved in rebuilding a menu item by item. It also gives restaurant teams more time to focus on the parts of the migration that need careful attention.
Here’s the thing. Importing the menu is only one part of the move. Restaurants should still review every category, product, price, variant, and modifier before launch. They also need to configure payment methods, delivery settings, pickup hours, QR codes, website ordering links, and outlet details.
Before switching fully, train the staff and place test orders on mobile and desktop. A careful review helps make sure customers see the right menu and the restaurant is ready to accept live orders.